Shower Screen Cleaning: Why Your Coffee Tastes Stale
Stale coffee taste? Master shower screen cleaning to remove oils and residue. Restore fresh espresso flavor with this maintenance guide.
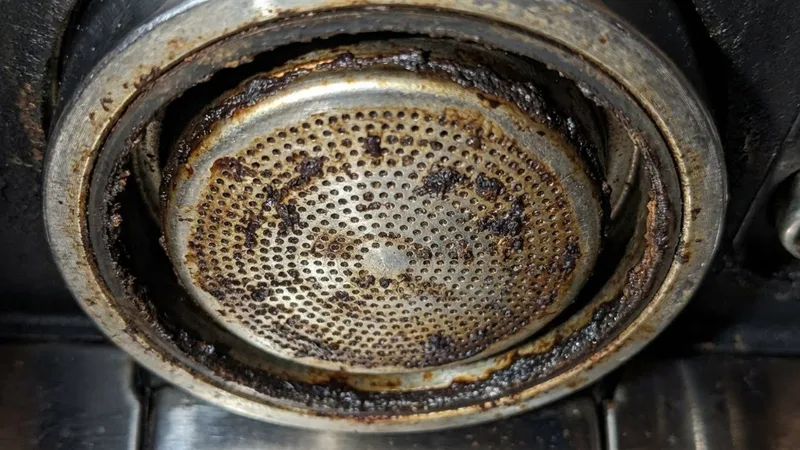
If your espresso tastes stale, bitter, or “off” despite fresh beans and proper technique, the culprit is often hiding in plain sight: your shower screen. This metal disc directly above your coffee accumulates oils and residue that contaminate every shot you pull.
I spent way too long blaming my beans before I finally looked up into my grouphead and saw the horror—a thick, brown layer of old coffee oils coating the shower screen. One 20-minute soak later, and my shots went from “meh” to “wow, that’s actually really good.” It was embarrassing how long I’d ignored this.
Regular shower screen cleaning is one of the most impactful—yet overlooked—maintenance tasks. Here’s how to do it right.
Why Dirty Shower Screens Ruin Coffee
The Contamination Cycle
Every shot deposits coffee oils on the shower screen. Without cleaning:
- Oils oxidize and become rancid
- Residue accumulates in and around the holes
- Each new shot picks up old, stale flavors
- Water distribution becomes uneven as holes clog
Taste Impact
| Shower Screen State | Coffee Taste |
|---|---|
| Clean | Fresh, clear flavors |
| Lightly dirty | Slightly muted brightness |
| Moderately dirty | Bitter, stale undertones |
| Heavily dirty | Distinctly rancid, old coffee taste |
Even fresh, perfectly roasted beans can’t overcome a contaminated shower screen.
Tools Required
For Daily Cleaning
- Group head brush (included with most machines)
- Clean water
For Weekly Cleaning
- Cleaning brush
- Backflush disc and cleaning tablets
For Monthly Deep Cleaning
- Flathead screwdriver or hex key
- Espresso machine cleaner (Cafiza, Biocaf, etc.)
- Small container for soaking
- Hot water
Daily Shower Screen Cleaning
After each brewing session (takes 30 seconds):
Step 1: Purge the Group Head
- Remove the portafilter
- Run the brew cycle for 2-3 seconds
- Water flushes loose grounds from the screen
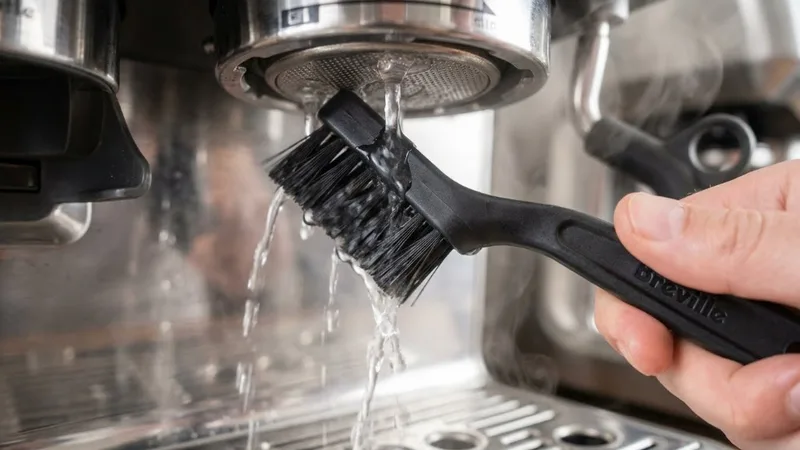
Step 2: Brush the Screen
- With water still running, scrub the screen with your group brush
- Use circular motions covering the entire surface
- Pay attention to edges where residue collects
Step 3: Final Flush
- Run water for another 2-3 seconds
- Water should run clear
- Wipe any remaining grounds from the group head rim
Time investment: 30 seconds. Impact: Prevents 90% of buildup issues.
Weekly Deep Cleaning
Backflushing removes oils that brushing can’t reach:
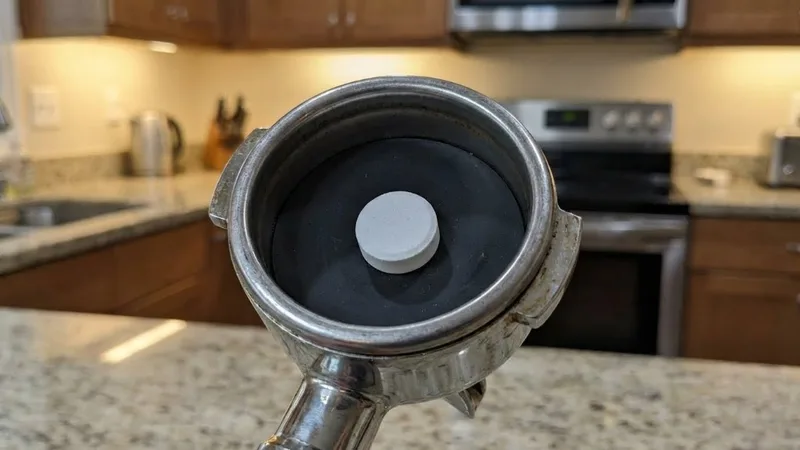
Step 1: Insert Cleaning Disc
- Place the rubber backflush disc in your portafilter
- Add one cleaning tablet (or 1/4 tsp cleaning powder)
- Lock portafilter into group head
Step 2: Run the Backflush Cycle
- Start the brew cycle
- Pressure builds, then releases (you’ll hear it)
- Run for 10 seconds
- Stop and wait 5 seconds
- Repeat 5-6 times
Step 3: Rinse
- Remove cleaning disc
- Lock in empty portafilter (no basket)
- Run water to flush cleaning solution
- Repeat until water runs clear and soap-free
Step 4: Test Taste
- Pull a “sacrificial” shot after cleaning
- Discard it—it may taste soapy
- Your next shot should taste noticeably fresher
Monthly Deep Cleaning (Removal)
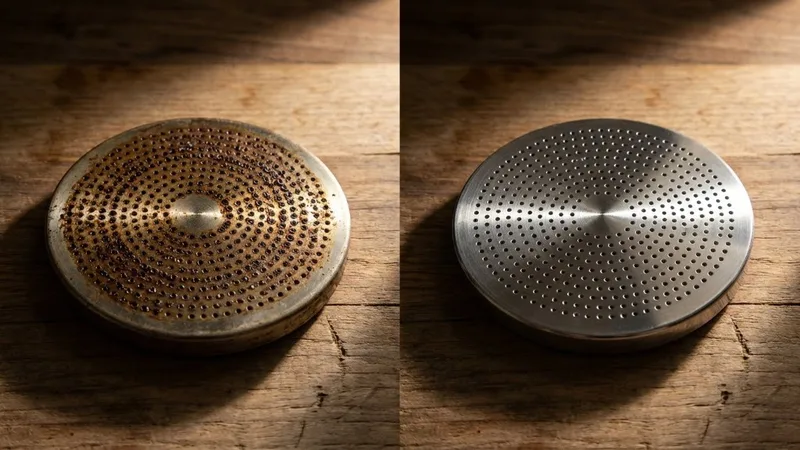
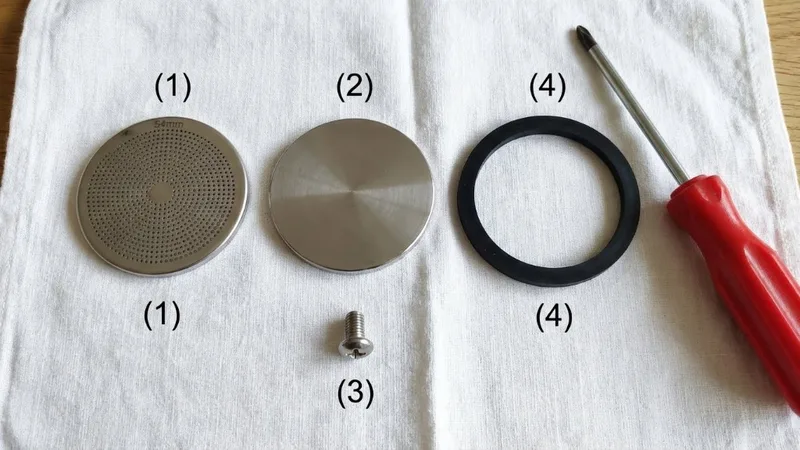
For thorough cleaning, remove the shower screen entirely:
Step 1: Remove the Screen
- Turn off and unplug your machine
- Wait for group head to cool
- Locate the center screw (Phillips or hex)
- Unscrew and remove
- Carefully pull out the shower screen
- Remove the dispersion plate behind it
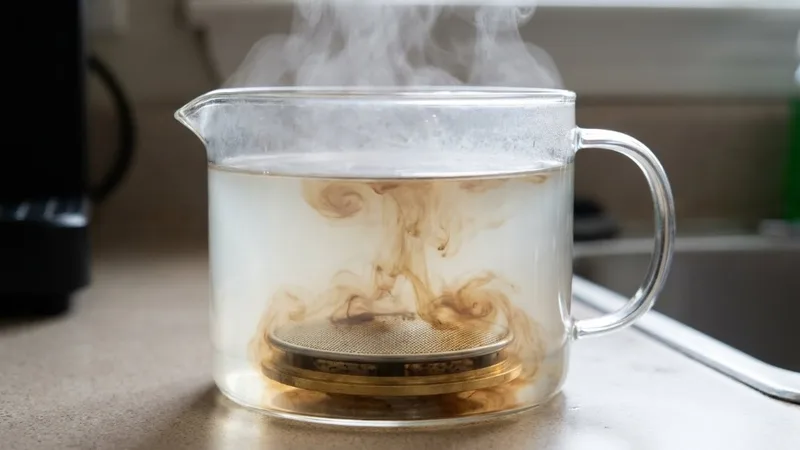
Step 2: Soak All Parts
- Heat water to near-boiling
- Dissolve cleaning powder (1-2 tablespoons)
- Submerge shower screen and dispersion plate
- Soak for 20-30 minutes
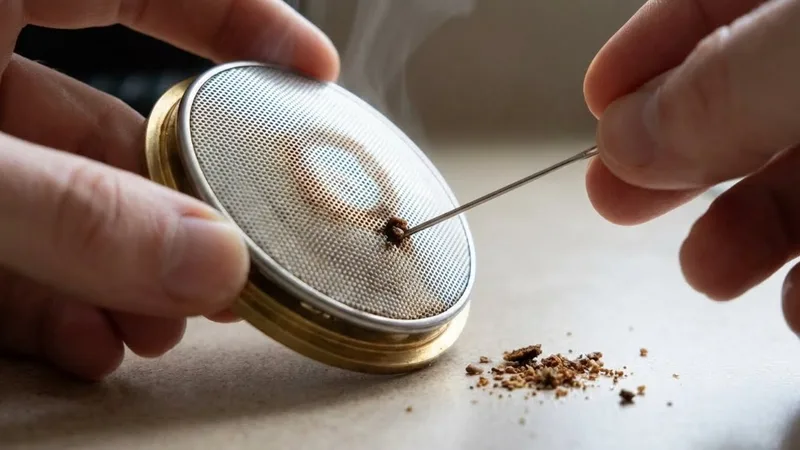
Step 3: Scrub
- Remove parts from solution
- Scrub with brush to remove softened residue
- Pay special attention to the holes in the screen
- Rinse thoroughly under running water
Step 4: Clean the Group Head Interior
While parts are out:
- Look up into the group head
- Wipe with damp cloth
- Remove any visible residue
- Don’t use excessive water—avoid the electronics
Step 5: Reassemble
- Dry all parts thoroughly
- Replace dispersion plate
- Replace shower screen
- Reinstall center screw (firm, not over-tight)

Step 6: Flush and Test
- Run water through group head
- Pull a test shot (discard)
- Your next shot should taste remarkably cleaner
Preventing Buildup
Best Practices
- Brush after every session—not every shot, but at least daily
- Backflush weekly with cleaning solution
- Never leave the portafilter locked in when not in use (keeps screen drier)
- Use fresh coffee—stale coffee has more rancid oils
Common Mistakes
- Skipping daily brushing: Oils accumulate quickly
- Backflushing with just water: Water alone doesn’t dissolve oils
- Using dish soap: Leaves residue that affects taste
- Neglecting the dispersion plate: It collects as much oil as the screen
Troubleshooting
Screen Still Dirty After Soaking
Cause: Severe buildup or mineral deposits
Fix:
- Soak longer (overnight)
- Try a stronger solution
- Use a pin to clear individual holes
- Consider replacement if permanently clogged
Water Doesn’t Flow Evenly
Cause: Holes clogged with mineral or organic deposits
Fix:
- Soak in descaler + cleaner
- Clear each hole with a pin
- Replace screen if holes are damaged
Strange Taste After Cleaning
Cause: Cleaning solution residue
Fix:
- Run more flush cycles
- Pull 2-3 sacrificial shots
- Ensure thorough rinsing before reassembly
When to Replace vs Clean
Replace the Shower Screen If:
- Holes are permanently clogged
- Screen is warped or damaged
- Corrosion is visible
- No amount of cleaning restores proper flow
Typical Replacement Interval
1-3 years depending on use and water quality. Many screens last the life of the machine with proper care.
Frequently Asked Questions
Why does shower screen cleaning fix stale coffee?
Old coffee oils oxidize and become rancid. Every shot passes through this contamination, picking up stale flavors. Clean screens mean only fresh coffee contacts your espresso.
How often should I clean the shower screen?
Daily: Brush and flush. Weekly: Backflush with cleaner. Monthly: Remove and soak.
Can I clean it with just water?
Daily brushing with water helps, but water alone doesn’t dissolve coffee oils. You need proper espresso machine cleaner for weekly/monthly cleaning.
What are signs my shower screen needs cleaning?
Stale taste, bitter notes, visible brown residue on the screen, or uneven water distribution during extraction.
Related Guides:
Mikael
Home espresso enthusiast and Breville specialist. Helping you master the art of coffee brewing from your own kitchen.
Learn more about me →